Sesame AI has recently stirred up a huge amount of hype with their ultra-realistic, open-source Conversational Speech Model (CSM). While the model is impressive, they didn't release the training code and there is strong demand for customization. This blog walks you through exactly how to fine-tune the CSM for any language or voice you desire!
If you're not fussed with the technical details and would like to jump straight into fine-tuning on your own datasets, you can do this by cloning the accompanying GitHub repo. You will only need the following 3 commands:
# Pre-tokenize data (for efficient training)
python pretokenize.py --train_data /path/to/train/metadata.json --val_data /path/to/val/metadata.json --output /path/to/tokenized/data.pkl

# (Optional) Hyperparameter sweep
python sweep.py --data /path/to/tokenized/data.pkl --sweep_config ./configs/sweep.yaml --output_dir ./my-sweep --n_epochs 3 --n_trials 50 --n_gpus 2 --wandb_api_key WANDB_API_KEY

# Main: Finetune the model
python finetune.py --data /path/to/tokenized/data.pkl --config ./configs/default.yaml --n_epochs 25 --gen_every 500 --gen_sentence "Marie aime les pommes et les poires." --wandb_api_key WANDB_API_KEY
In what follows, I will be assuming a basic knowledge of deep learning, generative models, and PyTorch.
Contents
- Theory
- Mimi audio tokenizer
- CSM architecture
- Efficient training
- Implementation
- Installation
- Dataset Preparation
- Training Pipeline
- Hyperparameter Optimization
- Closing Thoughts
Theory
Before we jump straight into implementation, I would like to quickly summarise the CSM architecture as well as clarify some technical points that are relevent for fine-tuning. I would also recommend reading the official blog post, which provides a great description and demo of the model.
Like many contemporary generative audio, image, and video models, Sesame's CSM is an autoregressive transformer which operates in the latent space of a pre-trained autoencoder. In particular, it operates on discrete audio tokens encoded by the Mimi split-RVQ tokenizer. There are two main reasons why this typically works better than using "raw" audio. Firstly, only a small fraction of raw audio content is actually perceptable to humans whilst the rest is noise. Discrete audio tokenizers like Mimi are very good at retaining just the perceptable signal, which allows the generative model to focus purely on what "matters". Secondly, autoregressive transformers generally work better on discrete inputs; there is just something special about cross entropy loss!
Text is tokenized by the Llama tokenizer, and the speaker information is incorporated by prepending a speaker ID to the text, prior to tokenization. For instance, we would tokenize "[3]I am so hungry right now" if the corresponding audio is spoken by speaker 3.
Mimi audio tokenizer
We don't really need to understand Mimi in depth as we will be using the pretrained model as-is, so feel free to skip this section. To quickly summarise, Mimi is comprised of three parts:
- A neural encoder that splits the audio signal into frames, passes them through a convolutional neural network and a transformer to produce a continuous latent vector for each frame.
- Split residual vector quantization to quantize and compress the latent vector. This works by first applying a single plain vector quantizer and training the resulting codebook to encode semantic information by minimizing cosine similarity with an embedding from the pre-trained WavLM model. In parallel, we also apply a multi-level RVQ model which works by first quantizing the raw latent vector, then iteratively quantizing the residual error from the previous quantization step. This gives us 1 semantic codebook (from the plain VQ) and acoustic codebooks (from the RVQ). These two components could each individually be used for reconstruction, but summing them together gives us an elegant way to capture semantic and acoustic information. Read more about RVQ here and split-RVQ in the original paper.
- A neural decoder that passes the quantized tokens through an inverse quanitzation process, then a transformer and CNN to reconstruct the audio waveform.
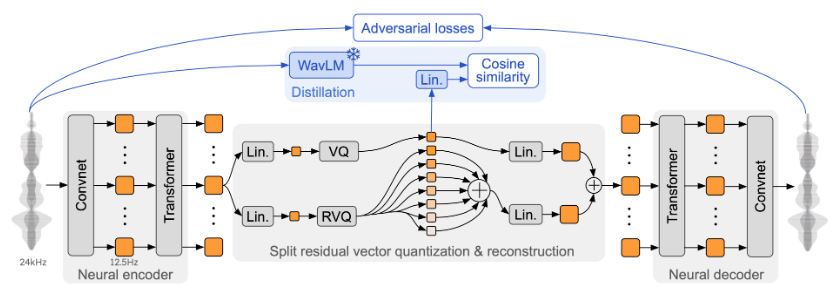
Schematic of the Mimi split-RVQ tokenizer architecture.
CSM-1B architecture
Sesame trained 3 models (CSM-1B, CSM-3B, CSM-8B) but only open-sourced their smallest: the CSM-1B. Though this is likely not the model used for their impressive demos, it is still a very strong TTS model. CSM-1B consists of a 1B transformer backbone and 100M transformer decoder, both of which are variants of the Llama architecture. The input to the backbone is interleaved audio and text tokens. I highly suspect that the motivation for this is that Sesame wanted their model to sound really conversational, so they would have trained on a large amount of conversational data and each training example might look something like:
["[1]Hey, how's it going?", audio_from_speaker_1, "[5]Going well thanks, you?", audio_from_speaker_5]
Once we have our interleaved tokens, we use the following procedure to obtain a prediction:
- The backbone operates directly on these tokens, producing an enbedding
hat each audio token position which is used to predict the next audio frame. - A single linear map is applied to the embedding
hto predict the zeroth codebook (the semantic codebook). - The decoder operates on the backbone embedding
hand all N codebooks and predicts the N - 1 acoustic codebooks.
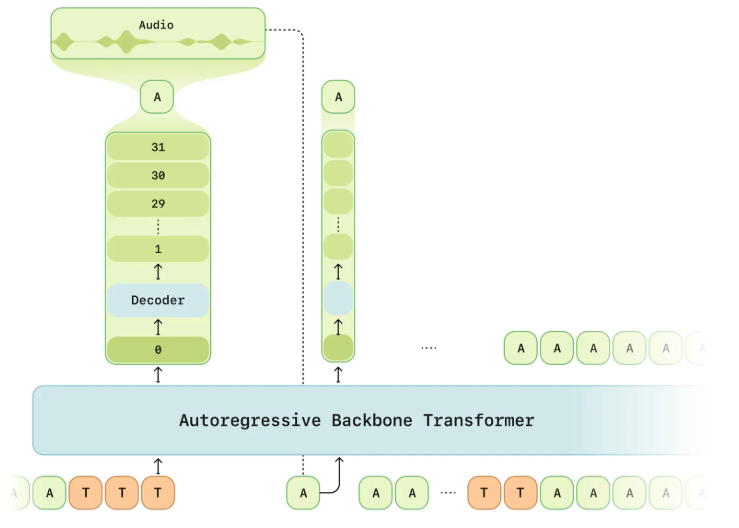
Schematic of Sesame's CSM model showing the backbone and decoder transformer.
Training
Compute amortization: The audio decoder is processing an effective batch size of batch_size x sequence_length x num_codebooks, which is a high memory burden and thus it significantly slows training and limits model scaling. To address this, the decoder is only trained on a random 1/16 subset of the audio frames, but the zeroth codebook is trained on every frame.
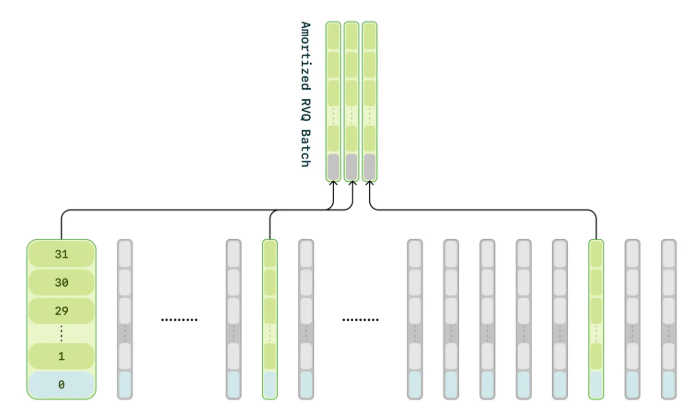
Schematic of compute amortization: only a subset of frames are used to train the decoder.
Sesame did not release all the details of their training procedure, but since we are using discrete tokens it is safe to assume that the model is trained using cross entropy loss. As mentionned, the backbone alone is enough to predict the zeroth codebook, then the decoder predicts the remaining codebooks. Theoretically, we could detach the decoder's input from the computational graph such that the backbone and decoder are trained separately, but I think it is also a safe assumption that they are trained concurrently. For an additional efficiency gain, we will be using bucketed sampling to minimize padding in batched training data.
Since we are interested in fine-tuning into new languages, we have elected to fine-tune by modifying the original weights rather than using techniques like LoRA.
Implementation
Now we have an understanding of the model and training procedure, lets look at how to implement the fine-tuning pipeline. Most TTS datasets are not conversational, hence to make this tutorial as compatible as possible with your data, we will not be interleaving text and audio as described above. However, I would definitely recommend doing this if you have conversational data available.
1. Installation
The sesame repo is not set up for installation as a python library (despite their setup.py file), thus to use their code we must manually install their repo and add the local version to our sys.path:
git clone https://github.com/SesameAILabs/csm.git ~/csm
cd ~/csm
git checkout 836f886515f0dec02c22ed2316cc78904bdc0f36
export CSM_PATH='~/csm'
Then in our code we can use
import sys
sys.path.append(os.getenv("CSM_PATH", "~/csm"))

# now we can import their model and other useful functionality
from models import Model
from generator import Generator
2. Data Set-up and Pre-tokenization
Unsurprisingly, you will need a dataset to fine-tune on. Prepare your dataset with train set and validation set metadata files where each entry contains: the path to an audio wav file, the text transcription, start / end times of the transcription in the wav file (optional), and the speaker ID (optional). An example metadata.json file might look like:
  {
    "text": "They had obvious value as wonders of the natural world.",
    "path": "/data/utterance_0.wav",
  },
  {
    "text": "At the time, Niagara Falls was a thriving community.",
    "path": "/data/utterance_1.wav",
  },
  {
    "text": "and ten years later the Fort Worth and Rio Grande Railroad laid tracks in the county.",
    "path": "/data/long_audio.wav",
    "start": 171.1,  # Start point (optional)
    "end": 182.6,    # End point (optional)
    "speaker": 30,   # Speaker id (optional)
  },
The CSM uses the pre-trained Mimi audio tokenizer and Llama3 text tokenizer as they come. Since we will likely want to do multiple training runs and train for multiple epochs on each run, it is more computationally efficient to tokenize and save out all our data before starting training (then we can reuse them for multiple runs).
Details
We can load our tokenizers like so:
from huggingface_hub import hf_hub_download
from moshi.models import loaders

sys.path.append(os.getenv("CSM_PATH", "~/csm"))
from generator import load_llama3_tokenizer

def load_tokenizers(device):
    text_tokenizer = load_llama3_tokenizer()
    mimi_weight = hf_hub_download(loaders.DEFAULT_REPO, loaders.MIMI_NAME)
    mimi = loaders.get_mimi(mimi_weight, device=device)
    mimi.set_num_codebooks(32)
    audio_tokenizer = mimi

    return text_tokenizer, audio_tokenizer
To tokenize our dataset using a metadata.json file, we can use:
import pandas as pd
from tqdm import tqdm
import torchaudio

MIMI_SAMPLE_RATE

def get_tokens(data_path, audio_tokenizer, text_tokenizer, device):
    df = pd.read_json(data_path)
    audio_tokens, text_tokens = [], []
    for _, data_point in tqdm(df.iterrows()):
        if "start" and "end" in data_point:
            sample_rate = torchaudio.info(data_point["path"]).sample_rate
            frame_offset = int(data_point["start"] * sample_rate)
            num_frames = int((data_point["end"] - data_point["start"]) * sample_rate)
        else:
            frame_offset = 0
            num_frames = -1

        # load audio
        audio_tensor, sample_rate = torchaudio.load(
            data_point["path"], frame_offset=frame_offset, num_frames=num_frames
        )
        audio_tensor = torchaudio.functional.resample(audio_tensor.squeeze(0), orig_freq=sample_rate, new_freq=MIMI_SAMPLE_RATE)
        audio_tensor = audio_tensor.unsqueeze(0).unsqueeze(0).to(device)

        # tokenize audio
        audio_tokens.append(audio_tokenizer.encode(audio_tensor)[0].tolist())

        # prepend speaker id and tokenize text
        text = f"[{data_point['speaker'] if 'speaker' in data_point else 999}]" + data_point["text"]
        text_tokens.append(text_tokenizer.encode(text))

    return audio_tokens, text_tokens
Finally we tokenize and save the train and validation sets. Tokenized text is represented by a list of token ids, whereas the tokenized representation of an audio sample is an array of shape num_codebooks x sequence_len containing token ids from the Mimi tokenizer codebooks.
device = torch.device("cuda" if torch.cuda.is_available() else "cpu")

text_tokenizer, audio_tokenizer = load_tokenizers(device)

audio_tokens_train, text_tokens_train = get_tokens("/path/to/train/metadata.json", audio_tokenizer, text_tokenizer, device)
audio_tokens_val, text_tokens_val = get_tokens("/path/to/val/metadata.json", audio_tokenizer, text_tokenizer, device)
all_tokens = {
    "audio_tokens_train": audio_tokens_train, # list[list[list[int]]]
    "text_tokens_train": text_tokens_train,   # list[list[int]]
    "audio_tokens_val": audio_tokens_val,     # list[list[list[int]]]
    "text_tokens_val": text_tokens_val,       # list[list[int]]
}

with open("/path/to/tokenized/data.pkl", "wb") as f:
    pickle.dump(all_tokens, f)
3. Dataloaders
Now we have our pre-tokenized data, we will build our dataloaders.
Details
Lets start by creating a simple self-explanatory dataset class:
from typing import List
import numpy as np
import torch

class TokenizedDataset(torch.utils.data.Dataset):
    def __init__(self, audio_tokens: List[List[List[int]]], text_tokens: List[List[int]]):
    self.audio_tokens = audio_tokens
    self.text_tokens = text_tokens

def __len__(self):
    return len(self.audio_tokens)

def __getitem__(self, index: int):
    return {"audio": self.audio_tokens[index], "text": self.text_tokens[index]}
Next we will write a collation function for the dataloader. This:
- Accepts a list of dictionaries returned by
TokenizedDataset.__getitem__ - Appends an EOS frame to the audio tokens
- Appends an extra dimension to the audio tokens to account for text tokens
- Creates a padding mask to indicate that the text dimension is padding for the audio tokens
- Prepends n_codebooks dimensions to the text tokens to account for audio tokens
- Creates a padding mask to indicate that the audio dimensions are padding for the text tokens
- Concatenates the text and audio tokens
- Pads the tokens and padding masks to the maximum sequence length in the batch
- Returns the tokens and padding masks
from typing import List
import torch
from torch.nn.utils.rnn import pad_sequence

def collate_fn(batch: List[dict]):
    tokens, tokens_mask = [], []
    n_codebooks = 32
    for item in batch:
        audio_tokens = torch.tensor(item["audio"]) # [n_codebooks, audio_seq_len]
        text_tokens = torch.tensor(item["text"])   # [text_seq_len]

        # add EOS frame
        eos_frame = torch.zeros(audio_tokens.size(0), 1)
        audio_tokens = torch.cat([audio_tokens, eos_frame], dim=1)  # [n_codebooks, audio_seq_len+1]

        # add extra dimension for text ids
        audio_frame = torch.zeros(audio_tokens.size(1), n_codebooks + 1).long()  # [audio_seq_len+1, n_codebooks+1]
        audio_frame[:, :-1] = audio_tokens.transpose(0, 1)
        audio_frame_mask = torch.zeros(audio_tokens.size(1), n_codebooks + 1).bool()  # [audio_seq_len+1, n_codebooks+1]
        audio_frame_mask[:, :-1] = True

        text_frame = torch.zeros(len(text_tokens), n_codebooks + 1).long()
        text_frame[:, -1] = torch.tensor(text_tokens)
        text_frame_mask = torch.zeros(len(text_tokens), n_codebooks + 1).bool()
        text_frame_mask[:, -1] = True

        tokens.append(torch.cat([text_frame, audio_frame], dim=0))
        tokens_mask.append(torch.cat([text_frame_mask, audio_frame_mask], dim=0))

    tokens = pad_sequence(tokens, batch_first=True)
    tokens_mask = pad_sequence(tokens_mask, batch_first=True, padding_value=False)

    # both: [batch_size, max_seq_len, n_codebooks+1]
    return tokens, tokens_mask
We will also make a sampler object that minimizes padding in batches by grouping samples with similar lengths:
class BucketSampler(torch.utils.data.sampler.Sampler):
    def __init__(
        self, lengths: List[int], batch_size: int, shuffle: bool = True, is_infinite: bool = True, random_seed: int = 42
    ):
        self.shuffle = shuffle
        self.batch_size = batch_size
        self.is_infinite = is_infinite
        self.random_seed = random_seed
        self.local_step = 0
        self.bins = self._create_bins(lengths, batch_size)

    def _create_bins(self, lengths: List[int], batch_size: int) -> List[List[int]]:
        indices_with_lengths = [(i, length) for i, length in enumerate(lengths)]
        indices_with_lengths.sort(key=lambda x: x[1])

        # Group into bins
        bins = []
        current_bin = []
        for idx, length in indices_with_lengths:
            if len(current_bin) >= batch_size:
                bins.append(current_bin)
                current_bin = []
            current_bin.append(idx)

        if current_bin:
            bins.append(current_bin)

        return bins

    def _shuffle_bins(self, epoch: int):
        rng = np.random.RandomState(epoch + self.random_seed)
        rng.shuffle(self.bins)  # shuffle bins
        for i in range(len(self.bins)):  # shuffle samples in each bin
            self.bins[i] = [self.bins[i][j] for j in rng.permutation(len(self.bins[i]))]

    def __iter__(self):
        epoch = 0
        while True:
            if self.shuffle:
                self._shuffle_bins(epoch)

            for bin_indices in self.bins:
                self.local_step += 1
                yield bin_indices

            if not self.is_infinite:
                break

            epoch += 1

    def __len__(self):
        return len(self.bins)
Finally we can create our dataloaders:
def create_dataloaders(all_tokens: dict, batch_size: int, infinite_train: bool = False):
    trainset = TokenizedDataset(all_tokens["audio_tokens_train"], all_tokens["text_tokens_train"])
    valset = TokenizedDataset(all_tokens["audio_tokens_val"], all_tokens["text_tokens_val"])

    trainsampler = BucketSampler(
        lengths=[len(tokens) for tokens in all_tokens["audio_tokens_train"]],
        batch_size=batch_size,
        is_infinite=infinite_train,
        shuffle=True,
    )

    valsampler = BucketSampler(
        lengths=[len(tokens) for tokens in all_tokens["audio_tokens_val"]],
        batch_size=batch_size,
        is_infinite=False,
        shuffle=False,
    )

    trainloader = torch.utils.data.DataLoader(
        trainset, batch_sampler=trainsampler, num_workers=0, collate_fn=collate_fn, pin_memory=True
    )

    valloader = torch.utils.data.DataLoader(
        valset, batch_sampler=valsampler, num_workers=0, collate_fn=collate_fn, pin_memory=True
    )

    return trainloader, valloader
4. Forward pass
Next we need to write the model's forward function which is missing from Sesame's code. This will implement compute amortization and calculate the loss.
Details
The forward function:
- embeds the tokens and retains only the non-padding embeddings
- computes the backbone attention mask using the padding mask
- does a forward pass through the backbone transformer and extracts the embeddings used for audio codebook prediction
- computes the first codebook loss
- implements amortization by training the decoder on a random 1/16 subset of audio tokens
- computes the decoder loss
- returns the total loss as a weighted sum of the backbone-only and decoder+backbone losses
def forward(self, tokens: torch.Tensor, tokens_mask: torch.Tensor):
    """
    tokens: (batch_size, seq_len, n_codebooks+1)
    tokens_mask: (batch_size, seq_len, n_codebooks+1)
    """
    dtype = next(self.parameters()).dtype
    bsz, seq_len, _ = tokens.size()
    device = tokens.device

    # embed tokens
    embeds = self._embed_tokens(tokens)

    # get targets and codebook embeddings corresponding to audio tokens
    audio_mask = tokens_mask[:, :, 0]  # [bsz, seq_len]
    target_tokens = tokens[audio_mask][:, :-1]  # [audio_len, n_codebooks]
    c_embeds = embeds[:, :, :-1, :][audio_mask]  # [audio_len, n_codebooks, embed_dim]

    # retain just non-padding embeddings
    masked_embeds = embeds * tokens_mask.unsqueeze(-1)
    h = masked_embeds.sum(dim=2)

    # backbone forward pass
    padding_mask = tokens_mask[:, :, 0] | tokens_mask[:, :, -1]  # [bsz, seq_len]
    backbone_attn_mask = _create_causal_mask(seq_len, device)  # [seq_len, seq_len]
    padding_3d = padding_mask.unsqueeze(-1) * padding_mask.unsqueeze(1)  # [bsz, seq_len, seq_len]
    backbone_attn_mask = backbone_attn_mask.unsqueeze(0) * padding_3d
    backbone_attn_mask = backbone_attn_mask | torch.eye(seq_len, device=device).bool().unsqueeze(0).expand(bsz, -1, -1)
    input_pos = torch.arange(0, seq_len).unsqueeze(0).expand(bsz, seq_len).long().to(device)
    h = self.backbone(h, input_pos=input_pos, mask=backbone_attn_mask).to(dtype=dtype)

    # get backbone embeddings used for audio codebook prediction
    audio_mask = torch.roll(audio_mask, -1, 1)  # shift audio mask to the right by 1
    audio_h = h[audio_mask]  # [audio_len, embed_dim]

    # predict first codebook and compute loss
    c0_logits = self.codebook0_head(audio_h)  # [audio_len, audio_vocab_size]
    c0_target = target_tokens[:, 0]  # [audio_len]
    c0_loss = F.cross_entropy(c0_logits, c0_target)

    # "compute amortization" (train decoder on random 1/16 subset of audio tokens)
    indices = torch.randperm(c_embeds.size(0))[: c_embeds.size(0) // 16]
    c_embeds = c_embeds[indices][:, :-1, :]  # [audio_len//16, n_codebooks-1, embed_dim]
    audio_h = audio_h[indices]  # [audio_len//16, embed_dim]
    target_tokens = target_tokens[indices][:, 1:]  # [audio_len//16, n_codebooks-1]

    # concatenate backbone embeddings and codebook embeddings for decoder input
    decoder_embeds = torch.cat(
        [audio_h.unsqueeze(1), c_embeds], dim=1
    )  # [audio_len//16, n_codebooks, embed_dim]
    N, n_codebooks, _ = decoder_embeds.size()
    c_pos = torch.arange(0, n_codebooks).unsqueeze(0).expand(N, n_codebooks).long().to(device)

    decoder_causal_mask = _create_causal_mask(decoder_embeds.size(1), device).expand(N, -1, -1)
    decoder_h = self.decoder(self.projection(decoder_embeds), input_pos=c_pos, mask=decoder_causal_mask).to(dtype=dtype)
    c_logits = torch.einsum("bsd,sdv->bsv", decoder_h[:, 1:, :], self.audio_head)

    c_loss = F.cross_entropy(c_logits.reshape(-1, c_logits.size(-1)), target_tokens.reshape(-1))

    loss = (1 - self.decoder_loss_weight) * c0_loss + self.decoder_loss_weight * c_loss
    return loss
We can add this custom forward function with:
import types

sys.path.append(os.getenv("CSM_PATH", "~/csm"))
from models import Model

def load_model(pretrained_model_name_or_path, device, decoder_loss_weight):
    model = Model.from_pretrained(pretrained_model_name_or_path)
    model.decoder_loss_weight = decoder_loss_weight
    model.forward = types.MethodType(forward, model)  # add the forward method to the model
    model = model.to(device=device, dtype=torch.bfloat16)
    return model
5. Training
We now have all the elements to write our training pipeline. Below is an heavily simplified training pipeline for illustration purposes only. For actually useful fine-tuning code, please refer to the GitHub repo, where we implement various useful techniques such as gradient clipping, accumulation, mixed precision training, better learning rate scheduling, experiment tracking, validation / generation, and more.
Details
import os
import pickle
from pathlib import Path
import torch
from torch.optim import AdamW
from torch.optim.lr_scheduler import LinearLR
from tqdm import tqdm

sys.path.append(os.getenv("CSM_PATH", "~/csm"))
from models import Model

n_epochs = 50
output_dir = Path("./exp")
output_dir.mkdir(parents=True, exist_ok=True)

device = torch.device("cuda" if torch.cuda.is_available() else "cpu")

# Define fine-tuning config
config = {
    "batch_size": 8,
    "learning_rate": 3e-5,
    "weight_decay": 0.002,
    "decoder_loss_weight": 0.5,
}

# Load tokenized data
with open("/path/to/tokenized/data.pkl", "rb") as f:
    all_tokens = pickle.load(f)

# Set-up (model, dataloaders, optimizer, LR scheduler)
model = load_model("sesame/csm-1b", device, config["decoder_loss_weight"])
trainloader, valloader = create_dataloaders(all_tokens, config["batch_size"])
optimizer = AdamW(model.parameters(), lr=config["learning_rate"], weight_decay=config["weight_decay"])
scheduler = LinearLR(optimizer, total_iters=n_epochs * len(trainloader))

# Simple training loop
model.train()
for epoch in range(n_epochs):
    for tokens, tokens_mask in tqdm(trainloader, desc=f"Epoch {epoch}"):
        tokens = tokens.to(device)
        tokens_mask = tokens_mask.to(device)

        loss = model(tokens, tokens_mask)
        loss.backward()

        optimizer.step()
        optimizer.zero_grad()
        scheduler.step()
(Optional) Hyperparameter Optimization
Successful fine-tuning of the CSM is fairly sensitive to the choice of hyperparameters, hence it is wise to sweep hyperparameters before the main fine-tuning run. I recommend using this script to perform the sweep, which offers:
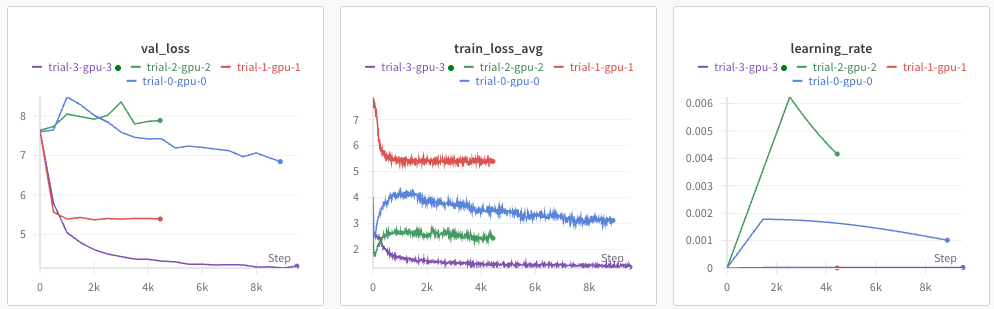
Parallelism of trials across multiple devices or within a single device.
Logging of trials to Weights & Biases for comparison. For example:
Various visualizations of results:
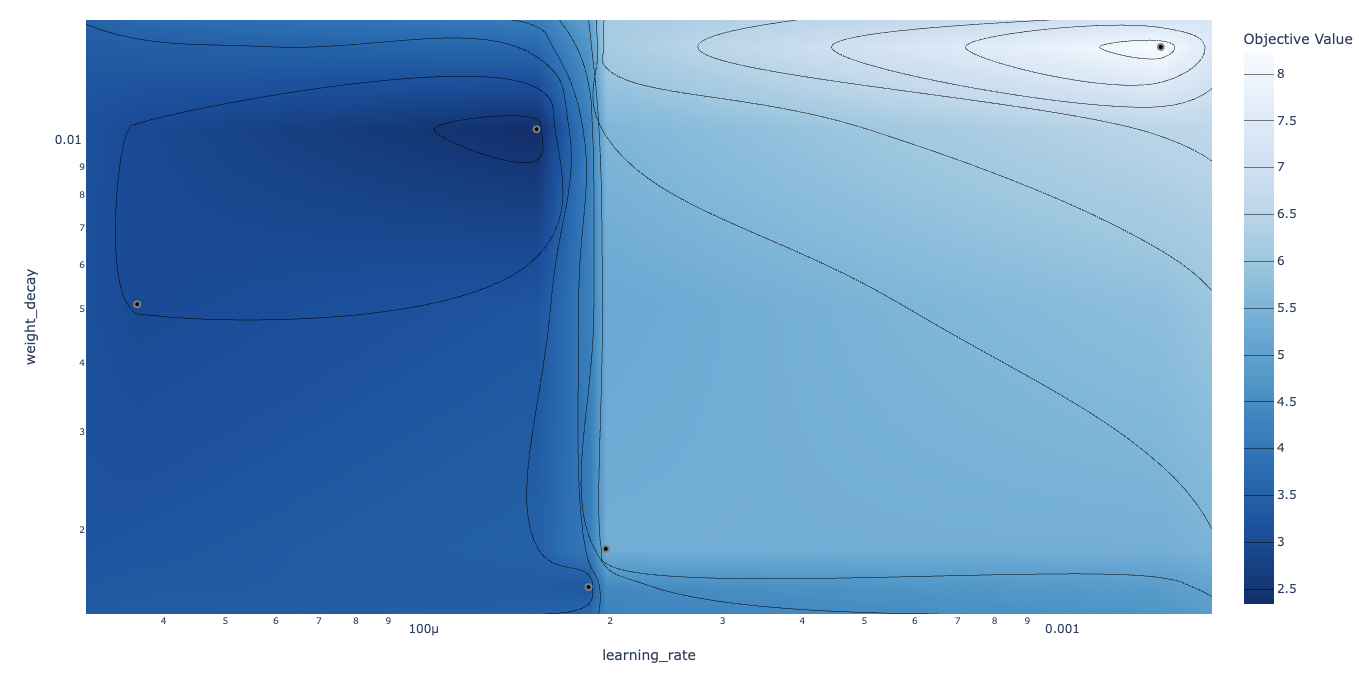
Parameter contours (validation loss for weight decay vs learning rate).
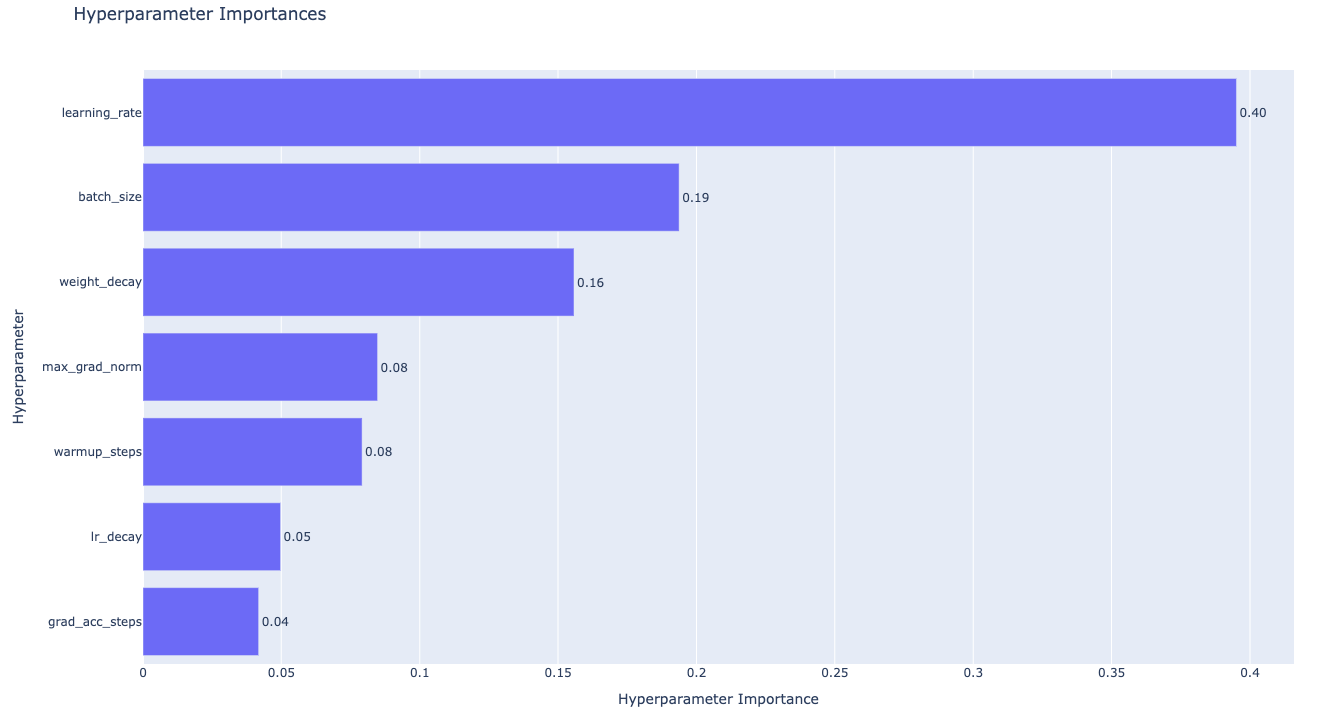
Parameter importances.
We use Optuna for sweeping hyperparameters, which offers two particularly useful features:
- Efficient searching of hyperparameter space using the Tree-structured Parzen Estimator algorithm.
- Pruning of unpromising trials early in training based on some stopping rule. Below our stopping rule is that a trial is pruned if the intermediate validation loss is worse than the median of previous trials at the same step.
For illustration purposes only, here is a simplified version of the sweep script:
Details
import os
import pickle
from pathlib import Path
import yaml
import optuna
import torch
from torch.optim import AdamW
from torch.optim.lr_scheduler import LinearLR
from tqdm import tqdm
import types

sys.path.append(os.getenv("CSM_PATH", "~/csm"))
from models import Model


def objective(trial, device, all_tokens, n_epochs):

    config = {
        "batch_size": trial.suggest_categorical("batch_size", [8, 16, 32]),
        "learning_rate": trial.suggest_float("learning_rate", 1e-6, 1e-2, log=True),
        "weight_decay": trial.suggest_float("weight_decay", 1e-3, 1e-1, log=True),
        "decoder_loss_weight": 0.5,
    }

    # Set-up (model, dataloaders, optimizer, LR scheduler)
    model = load_model("sesame/csm-1b", device, config["decoder_loss_weight"])
    trainloader, valloader = create_dataloaders(all_tokens, config["batch_size"])
    optimizer = AdamW(model.parameters(), lr=config["learning_rate"], weight_decay=config["weight_decay"])
    scheduler = LinearLR(optimizer, total_iters=n_epochs * len(trainloader))

    # Training loop
    model.train()
    best_val_loss = float('inf')

    for epoch in range(n_epochs):
        for tokens, tokens_mask in tqdm(trainloader, desc=f"Epoch {epoch}"):
            tokens, tokens_mask = tokens.to(device), tokens_mask.to(device)

            loss = model(tokens, tokens_mask)
            loss.backward()

            optimizer.step()
            optimizer.zero_grad()
            scheduler.step()

        # Validation
        model.eval()
        val_losses = []
        with torch.no_grad():
            for tokens, tokens_mask in valloader:
                tokens = tokens.to(device)
                tokens_mask = tokens_mask.to(device)
                loss = model(tokens, tokens_mask)
                val_losses.append(loss.item())

        val_loss = sum(val_losses) / len(val_losses)
        if val_loss < best_val_loss:
            best_val_loss = val_loss

        # Report to Optuna for pruning
        trial.report(val_loss, epoch)
        if trial.should_prune():
            raise optuna.exceptions.TrialPruned()

        model.train()

    return best_val_loss

with open("/path/to/tokenized/data.pkl", "rb") as f:
    all_tokens = pickle.load(f)

device = torch.device("cuda" if torch.cuda.is_available() else "cpu")

# Create study and run optimization
study = optuna.create_study(
    study_name="csm-sweep",
    direction="minimize",
    pruner=optuna.pruners.MedianPruner()
)

n_epochs = 3
study.optimize(
    lambda trial: objective(trial, device, all_tokens, n_epochs),
    n_trials=50
)

# Save best configuration
OUTPUT_DIR = Path("./sweep")
OUTPUT_DIR.mkdir(parents=True, exist_ok=True)
with open(OUTPUT_DIR / "best_config.yaml", "w") as f:
    yaml.safe_dump(study.best_trial.params, f, default_flow_style=False)
Closing thoughts
In this blog post, we explored:
- The model architecture, including the Mimi tokenizer and how it trains efficiently.
- How to prepare and pre-tokenize a dataset for fine-tuning.
- Implementation of efficient training with bucketed sampling and compute amortization.
- Hyperparameter optimization using Optuna.
Feel free to open issues on the GitHub repo if you run into any problems. Happy fine-tuning!